Showing posts with label recipes. Show all posts

Wednesday, September 1, 2010

In Which I Pickle And Can Some Beets

I like beets a lot. The problem with them is that many people have only encountered beets as those sodden, mushy slices available at salad bars, pinkening the baby corn with their drippings. And they often taste like dirt and metal. Which is a sad fate for the noble and delicious beet.

According to the interwebs:
  • Garden-beet is very low in calories (contain only 45 kcal/100 g) and fat; but is very rich in dietary fiber, vitamins and minerals.

  • The root is rich source of phytochemical compound Glycine betaine. Betaine has the property of lowering homocysteine levels in the blood. Homocysteine, one of highly toxic metabolite, promotes platelet clot as well as atherosclerotic-plaque formation which is otherwise can be harmful to blood vessels. High levels of homocystiene in the blood results in the development of coronary heart disease (CHD), stroke and peripheral vascular diseases.

  • Raw beets are an excellent source of folates; contains about 109 mcg/100 g ( Provides 27% of RDA). However, extensive cooking may significantly depletes its level in food. Folates are necessary for DNA synthesis in the cells. When given during peri-conception period folates can prevent neural tube defects in the baby.

  • It contains significant amounts of vitamin-C, one of the powerful natural antioxidant which helps body scavenge deleterious free radicals one of the reasons for cancers development.

  • Beet’s green leaves (tops) are an excellent source of carotenoids, flavonoid anti-oxidants and vitamin A; contain these compounds several times more than that of in the roots.Vitamin A is required maintaining healthy mucus membranes and skin and is also essential for vision. Consumption of natural vegetables rich in flavonoids helps to protect from lung and oral cavity cancers.

  • The root is also rich source of Niacin (vit B-3), Pantothenic acid (vit.B-5), Pyridoxine (vit.B-6) and carotenoids, and minerals such as iron, manganese and magnesium.

  • In addition, this root veggie indeed has very good levels of potassium. 100 g fresh root has 325 mg of potassium or 7% of daily requirements. Potassium lowers heart rate and regulates metabolism inside the cells by countering detrimental effects of sodium.

So, as you can see, beets are our friends and deserve better.

On the last day of our mountain vacation a couple of weeks ago, AlmondBoy picked 3 pounds of beautiful beets from our friends' garden. I debated what to do with them. Mr. Marzipan loves borscht, but our host remarked upon how he enjoys pickled beets and so I figured it might be neat for him to get a jar of his own beets in the mail as a thank-you. They're also highly flavorful and make a great addition to salads, negating the need for high-fat condiments.


The morning after we got home from our trip, I cut the greens from the beets and trimmed the roots. It is important to leave the taproot intact when you're cooking beets or else all of the color will leach out. And leave the base of the leaves on as well, Basically, your beet should look rather like a human heart. Do not peel the beets. You'll slip the skins, roots, and tops off after they've cooked.


Place the beets in boiling salted water. They'll need roughly 30-40 minutes to cook, but you'll know they're done when you can easily poke a knife through.

While you are cooking and preparing the beets, make your pickling solution. Pickling solution is a high-acid brine that will preserve your food. It is not necessary to can these beets, and you can just keep them in the fridge if you like. But I like to cook in bulk when possible, so canning and freezing are handy. I used this recipe for the brine. It was heavenly. The recipe is for 1 pound of beets, and I had 3. I actually made a quadruple batch of solution to ensure I'd have enough to fill the jars. If you're not canning, a 1:1 ratio is fine.

Once they are sufficiently tender, remove the beets to the sink, drain, and allow to cool.

Once the beets have cooled enough, pick them up and slip the skins off with your fingers. It is very fun to do, actually.


Chop the beets into cubes.


If you are canning, put the cubes into the strained brine and bring back to a boil. If not, just pour the strained marinade over the beets and put everything in the fridge.

Canning The Beets

I don't have a high pressure canner yet and therefore use the open bath method. Which is a fancy way of saying I can using a big pot of boiling water. I also never got around to buying canning tongs and just use use two pairs of silicon-tipped kitchen tongs. It works find for me, but canning tongs really are better. When you do open bath canning, make sure the jars stay covered with water at all times or the pressure gradient will cause an explosion.

Here is a good link to canning beets. Scroll down to step 11 as the first 10 steps deal with trimming, cooking, and making the brine. (The brine recipe I used is vastly superior.) They have their brine and beets separate, but you can use your combined and boiling mixture.

My 3 pounds of beets yielded 5 jars. I apologize for not taking pictures of the brinemaking and the canning process, but I kind of forgot.

Tuesday, August 24, 2010

In Which I Make Some Pizzas


I love making pizza. It's cheap, it's easy, and it can double as a craft for bored children. It's clay, it's finger paint, it's confetti. Pizza dough also freezes beautifully, providing an excellent make-ahead dinner. Just pull the frozen dough out in the morning, unwrap it, stick it in a covered bowl, and it will be thawed and risen in plenty of time for dinner. I'm always a bit bemused when people act like I'm making handcrafted croquenbouche towers from scratch when I mention making my own pizza. Anyone can do it, and for a small investment, you'll have all of the equipment you'll ever need need.

First, a pizza stone. You can spend a lot on a very high end one, you can spend between $10-$40 at a store like Target, or you can get unglazed (glazed ones can contain lead, so ask) terra cotta tile from the garden center for like $2 apiece. They're all fine, but thicker is better. Mine was around $50 and has lasted me a decade. I use it at least twice a week for a variety of baking needs but if I had known about the terra cotta tiles, I'd have one of those.

Next, a pizza pan. I strongly recommend that you get one that lets air flow through, like this one.

Okay! Now you need some pizza crust. There are two recipes I like to use. The first is my own whole wheat crust recipe, and I have never once had anyone complain about the texture. I served it to four children today and they all had at least two pieces. It is chewy rather than dense. The second recipe is based on the (delicious and brilliant) No-Knead Bread craze.

Here's a quick tutorial on dough: dough gets chewy and delicious because of gluten. Gluten is the protein in flour, and it's what differentiates things like cake and pastry flour (low gluten) from bread flour (high gluten). You can think of the gluten as being like chewing gum. It starts out as being soft and flexible but as it gets worked, it gets hard and stretchy, just like your Bubble Yum. It's why dessert recipes will often direct you to mix things until "just combined." Overworking a cake batter builds up gluten and you get tough cake. (Or cookies, or pie crust.)

All-purpose flour has 11% gluten, making it suitable for most day-to-day uses. It's what I buy (King Arthur Unbleached), and I alter as needed. It's too annoying to keep track of a bunch of extra flours beyond white, wheat, and anything specialty like rye. There's something known as "baker's math" but here's a basic approach that is pretty much no-fail. To substitute AP flour when cake flour is needed, remove two tablespoons per cup. So if a recipe calls for 1 cup of cake flour, measure one cup of AP and then take out two tablespoons. For bread flour, use the amount of AP flour called for and then 1.5 teaspoons of wheat gluten per cup. You can get wheat gluten at most grocery stores in the baking aisle and it's a little spendy, but it lasts a long time and comes out way cheaper than paying a premium for bread flour.

But in breads, we usually seek that chewiness and it's why we knead doughs and let them rise. Time and energy make for chewy gluten, and gluten will also give your bread a better rise. The first recipe relies primarily on kneading, the second on time. So! Here we go. I'm going to share the recipes first, then discuss shaping and baking because they're both done the same way.

Whole Wheat Crust

1/2 cup all purpose flour
1/2 cup vital wheat gluten
2 cups whole wheat flour
1 2/3 cups warm water
1 1/2 teaspoons yeast
1 1/4 teaspoons sugar
1 1/2 teaspoons salt
1 tablespoon olive oil, more if needed

Mix first four ingredients together, then knead for 5 minutes. (I use the dough hook in my Kitchen Aid.) Dough will be veeery sticky and wet, but do not add more flour. Allow to rest for 20 minutes.

After the dough is done resting, add the next three ingredients and knead the dough for ten minutes.

Coat a clean bowl with the tablespoon of olive oil and transfer the dough to the bowl, turning to coat it with the oil and prevent sticking. Add more if you need it.

Cover and allow to rise for about two hours or until the dough has at least doubled in size.

No-Knead Crust

Follow this link and do what they say.

***

Both of these recipes generate two pizzas each at our house. There are benefits to both hand-stretching and rolling dough, and I'll just let it come down to your preference. But here's a good tutorial on hand-stretching.

Sprinkle the counter with a little flour - just enough so it doesn't stick because too much will spoil your dough, plop half the dough on the flour, and either roll it out with a wooden rolling pin (the tapered dowel kind are the best in my book) or shape it with your hands. Spritz your pan with a little nonstick spray, then transfer your dough. Repeat with the other half.

***

So now we come to tomato sauce. There are many options out there. You can make your own from scratch, which I like to do when I can/feel like it/have tomatoes handy, but it's not always an option. There's good stuff available in jars too. But I think the best of both worlds is what I like to call Half-Assed Homeade Sauce.

Half-Assed Homemade Pizza Sauce

28 ounces crushed or whole peeled tomatoes (info on BPA in cans here, if you're interested)
Fresh or dried herbs to suit your taste (I use rosemary, oregano, basil, marjoram - Italian seasoning, basically)
1 - 2 tablespoons of olive oil, whatever your preference

Okay, this is so easy you'll kick yourself. If you're using whole tomatoes, you can heat them and stir to break up the pieces or just pour the tomatoes and juice into the food processor.

Take your dough, which you have rolled out and placed on your pan ->

Drizzle it with the olive oil ->

Sprinkle some herbs on top ->

Pour on however much liquefied tomatoes you like ->

Use your fingers to paint it all together on the crust ->

Voila! Sauce.

***

Now what? Well, the best pizzas come from very hot ovens. So I preheat my oven (and the pizza stone, which lives and works on the floor of my oven) at 500F for at least half an hour before I bake. One it's done heating, I place the sauced crust (and pan) on the pizza stone for 8 minutes.

No, I didn't forget the cheese. Putting the cheese on too early will give you one of two results in a home oven because they're nowhere near the temperatures of pizzeria ovens: Either underbaked, bland crust or burnt cheese.

Then I remove it and put the cheese on top. Fresh mozzarella is better, but kids like to sprinkle the grated stuff, so we usually go for that. Okay, now comes the tricky part. You want to get the parbaked pizza off the pan and onto the middle rack of your oven. I do it with a little wrist-flicking motion, but you can also use a spatula or tongs to help. Bake like that for about 5 minutes, or until the cheese is brown and bubbling.

Slide the pizza back onto the pan, allow to cool for a few minutes, then slice and serve!

The whole pizza at the top is a no-knead crust. Here's a side view of the whole wheat crust, which you can see has risen almost like a white flour one. AlmondGirl ate 5 pieces today. She has also apparently been sneaking up to Boston because she told me lunch was "wicked awesome."

Monday, May 3, 2010

In Which There Is Gelato And Also Langoustines

Partly because I tend to buy expensive food and partly because I hate wasting things and partly because I sometimes like to pretend I'm on a Food Network hidden camera show called Suburban Freezers, I save odds and ends of things in my freezer. When the tomatoes start to look elderly or the blackberries begin to take on a withered appearance, they go into the freezer for later use in sauces or jams. Fallen cakes await conversion to trifle, stale bread to French toast. I have containers of au jus, bagged poultry carcasses, and the occasional avocado.

But, for all my frugality, I loathe clutter. This extends to the freezer, and so on Saturday morning I went prowling through the big freezer in the basement in search of inspiration. I found it in the form of half a bag of frozen strawberries, three frozen mangoes, and a frozen banana. I recalled some buttermilk in the fridge, and decided that gelato was the order of the day.

A note on mangoes: they can sometimes be very starchy and fibrous, so be careful. I prefer champagne mangoes for this reason. And, because mangoes are annoying to cut up, be aware that Trader Joe's carries packages of halved ones in their freezer section. One package is about the equivalent of what I used here.

In the warmer months I always keep 1:1 simple syrup on hand. I make it in big batches, then store it in glass bottles in the fridge. It's nice to have for ice cream making and for mixed drinks, but it's also nice for making cold drinks like lemonade or sweetened iced tea because the sugar is already dissolved.


To make this gelato, I thawed the fruit in the microwave, but not entirely. The colder your starting mixture, the better resluts you'll get with your ice cream maker. Here's how much fruit I had, plus the banana. I'd estimate it at around 5 cups fresh, and around 3 thawed.


I then took 2 cups of simple syrup (in retrospect I think I might reduce the simple syrup to 1 1/2 cups) and combined it with the fruit in my food processor. I left some little chunks intact, but you can puree it as much as you like. I then added 2 cups of low-fat buttermilk (plain European or Greek style yogurt would do nicely as well) and the juice of 5 seedless lemons. Once everything was combined into a beautiful peachy color with ruby highlights, into the ice cream maker it went. After about 30 minutes in the ice cream maker, I scraped it into a plastic container and put it in the freezer to harden.


Because it was sultry out, I wanted to have a light dinner on the deck to complement this dessert. I pulled out a bag of langoustine tails. Langoustines are like teeny lobsters and the meat is very tender and sweet. AlmondBoy loves lobster but langoustines are cheaper, easier to work with in the kitchen, and much less fuss because you can buy bags of them at Trader Joe's, where someone has thoughtfully killed and packaged them for your convenience. I thawed the langoustines, then tossed them in a mixture of olive oil, garlic, sea salt, dried coriander, basil, and Greek oregano. I left them in the mixture for about thirty minutes while I got everything else ready.


I boiled half a box of whole wheat penne in salted water and let that cook while I cut a fresh pineapple into 8 long pieces. I put the pineapple on the grill and returned to the pasta. After draining the pasta, I added the langoustines and their juices, half a package of English peas, the juice of 2 lemons, and returned the pot to low heat. I wasn't quite happy with the results, so I added a quarter cup of Greek yogurt and found that it bound everything together perfectly.

Returning to the grill, I checked on the pineapple. It had been grilling for about 5 minutes and so I flipped it to let the other side finish. Grilled fruit is one of my favorite warm weather side dishes, and pineapple is one of the best. The charred spots have a deep, caramelly sweetness that goes wonderfully with the tart acidity of the fruit. As soon as the pineapple was charred to my liking, we ate. I had a lovely piece of Parmigiano Reggiano stravecchio, which we grated over the pasta. It was so good that I kept breaking off chunks to eat alone. The cheese was wonderful and nutty with delicious crunchy toffee-like crystals studded throughout. I luuuurve cheese.


For dessert, I served mugs of the gelato topped with Trader Joe's plain European style yogurt, drizzled with mesquite honey, and ornamented with a mint leaf plucked from the plant on the deck. It was heavenly. The sour, astringent creaminess of the yogurt was a perfect complement to the light, fruity gelato, and the sticky-sweet honey hardened from the cold into delicious chewy strands.


Friday, April 23, 2010

In Which There Is Stuffed Cabbage

I love stuffed cabbage. It's a great all in one dish and has lots of wonderful flavors and textures going on. It also always makes me think of my grandmother, because it is a specialty of hers. However, my grandmother makes a sweet version and the members of the Marzipan household prefer a tangy one. It's a little time consuming, but not at all bad if you break it down into steps. The rice, sauce, and cabbage can be prepared the day before. I like to make extra rice to serve on the side because the sauce is so delicious.

Stuffed Cabbage

1 Savoy cabbage, leaves stripped off
1 pound ground turkey
1 pound very lean ground beef
1 1/2 cups cooked brown rice
1/3 cup plain nonfat Greek yogurt or sour cream
2 teaspoons kosher salt
1 1/2 tablespoons olive oil
1 red onion, chopped
4 cloves garlic, minced
1 1/2 teaspoons paprika
1/2 teaspoon ground allspice
1/2 teaspoon black pepper

Tangy Tomato Sauce

a 28-ounce can crushed tomatoes (preferably Italian flavored)
1 cup chicken broth
3 bay leaves
Freshly ground black pepper to taste

***

Bring a large pot of salted water to a boil.

Add the cabbage leaves and cook, until tender, about 4 minutes. Drain the leaves into a colander in the sink and run under cold running water. Set aside.

In a large bowl (I use my Kitchen Aid with the paddle attachment) place the meat, rice, yogurt/sour cream, pepper, and 2 teaspoons salt and mix together very well.

Heat the olive oil in a skillet over medium heat. Add the onion and garlic and cook, stirring, about 7 minutes. Stir in the paprika and allspice and cook, stirring, about 2 minutes more. Add the onion mixture to the beef mixture and mix until well combined. Season with pepper to taste.


Lay the cabbage leaves on a work surface and blot dry with paper towels. Now take a look at the back side of your leaves. See that thick ridge at the base of the leaf? Trim it nice and flat with a very sharp knife. This way your leaves will lay flat on your work surface and not split. Just make sure you trim the ridge, not slice a hole in the leaf.

Starting with the largest leaves, place about 1/2 cup of the beef mixture in the bottom center of each leaf. (You should have enough for 10 very generously filled rolls.) Roll the bottom of the leaf over the beef mixture, fold in the sides, and continue rolling forward until completely closed. Repeat with the remaining leaves. If you need, you can make little patches with smaller leaves if the big ones tear.


Arrange the rolls seam side-down in a 9-x 13- x 2- inch baking dish.


Preheat the oven to 375 degrees F.

In a medium saucepan, combine the tomatoes, broth, and bay leaves. Bring to a boil and season with pepper to taste. Fish out the bay leaves, then pour over the cabbage rolls and cover the baking dish tightly with foil. Bake for 1 hour.


Remove the foil from the baking dish and continue cooking until lightly browned and cooked through, about another 30 minutes.


Cut open and devour.


AlmondGirl approved!

Friday, April 9, 2010

In Which There Is Steak Salad

There's a certain self-congratulatory pretentiousness inherent in calling oneself a foodie and so I'm reluctant to use the term, but I do love good food. The problem with loving good food is that it tends to get expensive and so if one has a weekly grocery budget to which one likes to adhere, one must stretch those ingredients however possible. And when one of the people one feeds is a 6'5 man with a proportionately large appetite, that can take work.

Last night we had steak salads for dinner. Salads are one of my favorite things to eat because of the fact that they are bulky and filling without being heavy. They're endlessly variable and provide an excellent way to make the most of pricey and/or calorie-dense foods. Steak salads are a always a hit around here and they are a great way to showcase some really high-quality ingredients. No dressing needed. All items shown were purchased at Wegman's

The components of last night's salads were Wegman's organic spring mix, Wegman's perfect portions of organic grass-fed sirloin, sauteed mushrooms and red onions, St. Agur (one of my absolute favorite blue cheeses), walnuts, and dried cranberries.


To begin, I sprinkled the steaks with kosher salt and seared them on the grill. While they were cooking, I sliced the mushrooms and red onions, then cooked them until caramelized in a pan sprayed with Pam.


When the steaks were done to our taste (we eat them rare at the Marzipan household) I let them sit for about 5 minutes, then sliced them.


Assembling the salads was a snap. Bed of lettuce, saute mix and steak so the juices would run down, then top with cheese, nuts, and cranberries.


Detail of the tastiness:


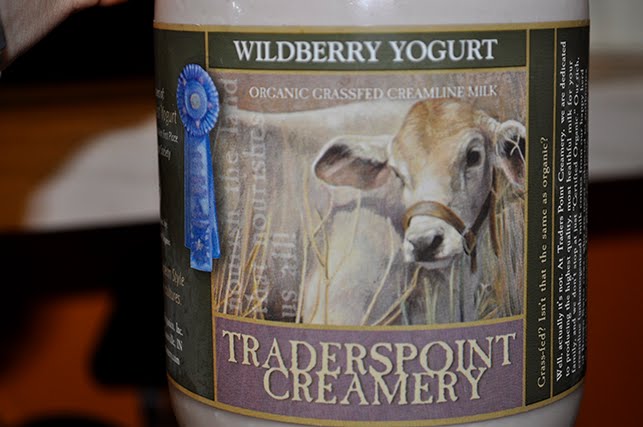
For dessert, the kids had some Pocky that I picked up from Han Ah Reum and Mr. Marzipan and I had rock glasses full of Traderspoint Wildberry Yogurt. It is amazingly creamy and rich and heavenly, and contains only a few more calories and far less sugar than that godawful stuff stabilized with cornstarch and gelatin. And such lovely packaging! It's in a glass bottle with this pretty label.

Monday, March 22, 2010

In Which I Bake A Fire Truck Cake

There comes a moment in every woman's life - if she is the mother of a small, fire-truck obsessed boy - when she will be asked to bake a cake shaped like a fire truck. And if this moment comes very early on a Wednesday morning and the boy is sufficiently wide eyed and adorable and her husband is already in the shower and can't intervene, she will say yes.

So, in the spirit of letting others learn from my mistakes, I bring you my step by step Guide To Making A Fire Truck Cake. Please note that I have never taken a cake decorating class. I can't pipe a beautiful rosette, or sculpt a scale-model medieval castle from gum paste. I did not walk to the fire station and take pictures first, so this cake is what fire trucks kind of look like in my head, but would cause you to panic if one like it arrived at your house for the purpose of flame extinguishment. I am a good baker, but a lousy decorator. So this is not a Duff Goldman cake. (Which, incidentally, are beautiful but don't taste so good.) This is a Mom Cake. This is a cake that suffered cake slumpage after being beset by cats and had to then be reinforced with bamboo skewers.

First things first. I recommend using a firm cake recipe for any kind of sculpted cake. I like the Magnolia cake recipes because they're slightly dense. If you want to use a mix, do the thing where you add pudding to make a kind of pound cake. Use 2-3 recipes/mixes per fire truck, depending on how tall you want the cake. I did 3 for each of these. The yellow cake is yellow cake (see what I did there?) and the red cake is chocolate.

I use the Magnolia buttercream recipe for almost every buttercreamed baked good I make. It's very tasty and very easy. The yellow cake is filled with vanilla buttercream and the chocolate cake with chocolate buttercream. (Which I make by replacing some of the vanilla's powdered sugar with cocoa powder.) Both are frosted with tinted vanilla. It took about half a batch to fill each cake and one batch to frost. Make all of the frosting at once (or in two batches, whatever you can do in your mixer bowl) and tint separately.

The yellow frosting was colored with a small amount of Wilton's Lemon Yellow gel coloring. The red frosting took three whole containers of No-Taste Red to color, which is typical for red. The color deepens and intensifies over time, so don't worry if it looks a little magenta at first. And definitely get the No-Taste Red because otherwise your cake will taste like evil.

For the silver, take some vanilla frosting and stir in some black decorating icing (the tube kind) from the store until you have a nice metallic gray. They make black gel icing but sometimes the color goes all weird and you'll need black for the wiper blades and stuff, so I say go for the tube.

Or, if you like, skip making your own and buy containers of vanilla frosting and tint.

Materials

1 sheet cake pan
Disposable pastry bags (Ziplocs work okay too)
1 large offset spatula
1 small offset spatula
Electric mixer
Silicone pastry brush
Bamboo skewers (if you have cats)
Cake board (foil covered cookie sheets are great)
2-3 batches of cake batter per fire truck
Roughly 1.5 batches of buttercream total per fire truck Meringue powder
Powdered sugar
Gel food colorings
1 tube black icing
Mini chocolate frosted donuts
Assorted candies

***

Okay, these pictures are pretty bad, but I was in a hurry.

***
Step One: Mix up the batter

I mixed the batters separately in my stand mixer, then combined them in a Tupperware vat to mix them all together. It was a lot of cake. You'll probably have to bake it longer than usual if you use 3 batters. If you go with 2, you'll probably have to underbake so it's not too dry. Just keep checking.


Step Two: Trim the cake

After the cake has cooled and you've turned it out of the pan, use a very sharp knife to even up the top and sides. If you like, freeze the cake and do all of the cutting frozen. I had to do that with a Mad Hatter-style cake I made once. It made things much easier.


Step Three: Cut the pieces

The cake is 17 inches wide and after trimming, I cut it into three sections of about 5 2/3 inches wide. One of these thirds was then cut into thirds along the width, each third being about 3 3/4 inches. Behold:


Step Four: Laying out the pieces

The two big pieces are the body of the cake and the three small ones are the cab. I set it up just to see what needs trimming and so forth. Note that I cut out a chunk from part of the top layer of the truck body. That's for that metal compartment on the fire truck.


Step Four: Glue it together

Spread thickly with buttercream and stack everything together. After gluing, I cut a slant from the top front of the cab for the windshield area.


Step Five: Crumb coat

Please crumb coat your cakes. It's easy and you will be glad you did. A crumb coat is just a very thin layer of frosting put on the cake to make the cake smooth when the time comes to put on the final coat. Use a silicone pastry brush (they're like $4 at the grocery store) to brush all the loose crumbs off. Then spread a very thin layer of frosting over the whole cake. Let the crumb coat sit for at least an hour. I covered mine with plastic wrap and left them over night, or you can take this time to make your royal icing.


Step Six: Ladders and glass

I used royal icing to pipe the ladders, windows, and windshields. Do not be scared of this. It is very easy, even for the severely Coordination Impaired such as myself. Royal icing is simply meringue powder, water, and powdered sugar. You beat it in your mixer, glop it into a pastry bag, snip a weensy little hole in the end, and have fun. I love it for cookies because you can flood with it.

I drew a template on white paper, taped it to a cutting board, taped waxed paper over my template, and made all the pieces for my ladder. The ladder pieces need about 6 hours to dry and the windows would do best overnight. You'll know when they're ready because they'll come right off the wax paper. Just be careful because they are fragile. After they were dry , I used more royal icing to glue the ladder together. Let the completed ladder dry over night at least.

If you've never used a piping bag before, you can watch this video here. I don't bother using a coupler and tip for stuff like this. Just use scissors to snip a tiny (really tiny - like 1/8 of an inch) piece off the end.

Note: The picture of the completed ladder was taken with my new camera. Even though I don't know how to really use it yet, the difference in image quality is impressive I think.


Step Seven: Frosting and decorating the cake

Spread a generous layer of tinted buttercream over your crumb coat. If it's sticking, it's probably too thick. Whip a little milk into the frosting until it spreads smoothly. Also, keep a glass of water handy to dip your spatula in and smooth over rough spots as needed. Not too often or you'll sog the cake, but a little is okay.

Spread the silver frosting over the indentation you made between the body and the cab. Pipe a silver border around the base and over the wheels if you like, and use the small offset spatula to make the bumper. Use the mini donuts as wheels and put a dot of silver in the center of each for a hubcap.

Use whatever candies strike your fancy for the rest of it. I used Tootsie Pop Drops, a Rolo, and a licorice allsort for the top. The doodads on the side are mini jujubees, the headlights are licorice allsorts. The red cake has some licorice wheels on the silver part to help disguise the slumpage-induced crack. I got all of the candies from the bulk candy bins at Wegman's. The hose thingies on the side are Oreo cookie straws. I stuck toothpicks into them, spiked those into the cake and, for good measure, used a ledge made of a popsicle stick. In retrospect I would have skipped the ledge because I don't like non-edible decorations on cakes.


Perch the ladder on top, and voila! (Note the enucleated red cake in the background. SIGH.)


At first I considered doing this in fondant, but even marshmallow fondant doesn't taste great. I also thought about doing a lot more detail, like a bi-color top and also making a little door with a shield and a latch on it, but I think this is fine for a 4 year old's party, to be honest with you. He seemed happy, anyway!


Monday, March 15, 2010

In Which I Return To Virtue

Because I have decided to lose 9 pounds by our Florida vacation in May, I am back to being virtuous even though there are donuts from my son's class party and these little chocolate covered toffee things my daughter likes and a 5 gallon drum of crack-laced Goldfish and so on.

Trader Joe's is my primary source of groceries. I went grocery shopping on Saturday and obtained an enormous amount of delicious and reasonably priced foodstuffs. When I was a kid I had these fantasies where I'd grow up and eat Easy Cheese directly from the container for dinner and follow it up with a half-gallon of ice cream and, I don't know, gin. Just because I could, I guess. But the fact is that while I enjoyed that in college for a brief stint, in general I feel so good when I eat well. I feel happy and healthy and in control and the fleeting deliciousness of half a bag of Doritos never comes close to the high of the impressed look on my husband's face when I demand that he poke me in the obliques. (That sounds naughty, doesn't it?)

For breakfast today I had a Dannon Light and Fit cherry vanilla yogurt into which I stirred 1 sliced banana and 1/4 cup of Trader Joe's Organic Morning Lite cereal. I had a glass of V8 and a glass of water with this. I always like to eat my meals on actual china, sitting at the table, reading a book or listening to music. I love food and even with two small children, I try and take the time to enjoy my meals. So my yogurt gets dumped into a bowl and I set everything on a place mat. I like taking time for myself. Anyway, breakfast was:

293 calories
1 gram of fat
9 grams of protein.

Went to the gym and did 30 minutes of weights, 10 minutes on the Stairmaster at 72 steps per minute, and 30 minutes on the elliptical at a burn rate of 800 calories per hour. Took some time in the sauna, then had a Pure Protein chocolate peanut butter bar. I had about 50 ounces of water during and after my workout. The protein bar contained:

190 calories
6 grams of fat
20 grams of protein.

Lunch was a magnificent salad, made entirely of ingredients from my beloved TJ's. 2 cups organic heirloom lettuce, 1/4 cup shredded organic pea shoots, three breaded chicken tenderloins (in the frozen section), 1/2 red pepper, 7 stalks blanched asparagus, 1/2 of an avocado, 1/4 serving Crunchy Curls, and 1 serving Parmesan ranch dressing. Is it not beautiful?


395 calories
15.5 grams of fat
23.65 grams of protein


I feel amazing and focused and back on track It's wonderful. When I treat myself well in this way I feel clean inside. I'm not sure how else to describe it.